Caution: Please check online for the most up to date DomBom ReadMe.
This tutorial takes each script one at a time and may be easier to understand, if you're new to installing cgi scripts.
Also see:
-ReadMe-A
basic overview of the installation plus intro to using DomBom
ProfitBombs.
-Support
Forum-If you need help, here's where to get it
-Keyword
Armory and Keyword2Link Converter
It is highly recommended that you print out this tutorial. You will also need the following info a couple of times, so it will be helpful to write them down.
SearchFeed Affiliate #________
SearchFeed Commision Percentage
____
RevenuePilot Affiliate #________ Amazon Affiliate ID ___________
Path to Perl ___________ Not needed if you host on NewWebHost. It is already set for you.
searchbomb.cgi.
Searchbomb.cgi is actually the hardest. Once you're done with searchbomb, everything is downhill from here.
Open it in any text editor, such as Notepad.
Skip #1 if you're hosted with NewWebHost. The Path to Perl is already set for you.
1. Change path to perl, if needed. (This is the very first line of searchbomb.cgi. It is set to the most common path: #!/usr/bin/perl
You will need to get this info from your host.
2. Setting the
options. You will see some options that you need to set
so that you get paid correctly, control how many links to show on a page,
etc.
A. Your SearchFeed affiliate code. Change the number "1925" to your own SearchFeed Affiliate number.B. Enter your SearchFeed commission percentage so searchbomb knows how much you make for each click. This is usually 35% to begin with.
C. Your RevenuePilot affiliate code. Change the number "2067" to your own RevenuePilot Affiliate number.
D. "my results" Optional. This numbers determines how many links you want to display on each page. This is set to show 20 links for each search. If you want to show 25 links, change this number to "25".
E. "my show value" Optional. If you want to show the amount you make from each bid, choose "y". If you don't want to show the money for each click, change to "n" (no). You will probably get more clicks if set to "n", however there may soon be laws passed that require you to identify links that you get paid for. The choice is yours.
Note: All RevenuePilot affiliates have the same commission percentage, so no need to change it.
Note: There are no letters in the scripts
to identify the options. This will mess up the code. I just use letters here
to help with this tutorial.
From the script:
A. my
$searchfeed_affiliate_number=1925; #enter
your own aff number
B. my
$searchfeed_comission=0.50;
#50% comission
C. my
$revenuepilot_affiliate_number=2067; #enter your
own aff number
my
$revenuepilot_comission=0.60;
#60% comission
my $timeout =
150;
#10=0.1 seconds
my
$header="searchbomb_templates/search_header.html"; #define
a file with path for header
my
$footer="searchbomb_templates/search_footer.html";
#define a file with path for footer
D. my
$results=20;
#10 is the total number of results to show
E. my
$showval="y";
#Set to "y" to always show the value,
3. Save.
4. Upload searchbomb.cgi and the folder "searchbomb_templates", instructions below.
5. Test Searchbomb. Now, go to searchbomb using a web browser such as Internet Explorer. To do this depends on how your site is set up. For 90% of the sites, you can just substitute your domain for "mydomain.com"
http://www.mydomain.com/cgi-bin/searchbomb.cgi
If everything is set up correctly, you now have your very own Pay Per Click search engine in place.
Plus, it's all downhill from here! You've
successfully installed the most difficult "bomb" and the rest will be a piece
of cake.
Blenderbomb.cgi- (Very similar to searchbomb)
Skip #1 if you're hosted with NewWebHost. The Path to Perl is already set for you.
1. Change path to perl, if needed. See above "searchbomb" for more.
2. Setting the options.
A. Enter your SearchFeed affiliate number. Change the number "1925" to your own SearchFeed Affiliate number.B. Enter your SearchFeed commission percentage so blenderbomb knows how much you make for each click.
C. Enter your RevenuePilot affiliate code. Change the number "2067" to your own RevenuePilot Affiliate number.
Note: There are no letters in the scripts
to identify the options. This will mess up the code. I just use letters here
to help with this tutorial.
From the script:
A. my $searchfeed_affiliate_number=1925; #enter your own aff number
B. my $searchfeed_comission=0.50; #50% comission
C. my $revenuepilot_affiliate_number=1200; #enter your own aff number
3. Save.
4. Upload it, instructions below.
Note: You can configure to show bids or not, and how many links to display. Unlike searchbomb above, with blenderbomb you do this directly in the blenderbomb SSI tags that you insert directly into your webpages.
Please refer to the DomBom Forum for more on tags.
Note: If you're a newbie, don't worry
about the other options.
sfbomb.cgi-
Skip #1 if you're hosted with NewWebHost. It's already set for you.
1. Change path to perl, if needed. See above "searchbomb" for more.
2. Setting the options.
This one is easy, just change 1925 to your own SearchFeed
Affiliate number. No need to enter your commission percentage. SFbomb displays
only searchfeed links, so your commission doesn't matter.
From the script:
my $Searchfeed_Affiliate_number=1925; #enter your own aff number
3. Save.
4. Upload it, instructions below.
Note: If you're a newbie, don't worry
about the other options.
Pilotbomb.cgi
Skip #1 if you're hosted with NewWebHost. The Path to Perl is already set for you.
1. Change path to perl, if needed. See above "searchbomb" for more.
2. Setting the
options. Just enter your own RevenuePilot Affiliate number.
No need to enter your commission percentage. Pilotbomb displays only revenuepilot
links, so your commission doesn't matter. Just change 2067 to your number.
From the script:
my $revenuepilot_Affiliate_number=2067; #enter your own aff number
3. Save.
4. Upload it, instructions below.
Note: If you're a newbie, don't worry
about the other options.
Odpbomb.cgi
Skip #1 if you're hosted with NewWebHost. The Path to Perl is already set for you.
1. Change path to perl, if needed. See above "searchbomb" for more.
2. Save.
3. Upload it, instructions below.
Note: If you're a newbie, don't worry
about the other options.
Random.cgi-
Skip #1 if you're hosted with NewWebHost. The Path to Perl is already set for you.
1. Change path to perl, if needed. See above "searchbomb" for more.
2. Save.
3. Upload it, instructions below.
Note: If you're a newbie, don't worry
about the other options.
Amazon.cgi-
Skip #1 if you're hosted with NewWebHost. The Path to Perl is already set for you.
1. Change path to perl, if needed. See above "searchbomb" for more.
2. Look for this line: @associate_ids = ("kurtmelvin-20");
Change "kurtmelvin-20" to "yourAmazonAffiliateID"
3. Save.
4. Upload it, instructions below.
Note: If you're a newbie, don't worry
about the other options.
Using LeechFTP to install DomBom ProfitBombs on NewWebHosting.
Download LeechFTP for free.
We use LeechFTP because it is free and it is very easy. The same general principles will apply to most FTP programs.
We use NewWebHost because it is the perfect fit for use with DomBom ProfitBombs. Once your first NewWebHost is set up, all you have to do is type in your domain name and NewWebHost will automatically install the ProfitBombs scripts for you instantly!
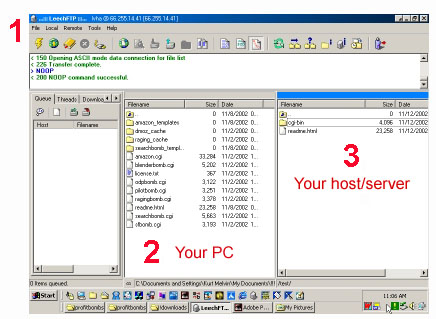
There are three main things to understand when attempting to FTP for the first time.
1. You need to connect your PC to your web host or server so you can send your stuff to the server.
2. "Your PC" Window. Use this window to find the ProfitBombs on your computer.
3. The host or server window. This is where you upload stuff from your PC. It is important to upload stuff to the right place.
1. Connect to your host. First, click "File" locate near the "1" on the image above. Then click "Connect...".
A pop-up window will appear such as in the image below:.
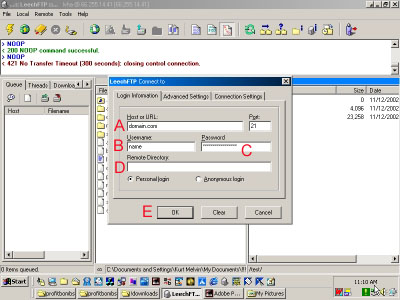
Enter the info supplied by NewWebHost (or your hosting company).
A. Your domain.
B.
Your user
name
C. Your password.
D. Remote Directory. This isn't needed for
NewWebHost, although it may be needed for other hosting
companies.
E. Click "OK".
If everything has been entered correctly,
in a few seconds you should "make a connection" and a list of your domains
hosted a NewWebSite should appear in the box on the right
(#3).
* **Make a bookmark. If you've made a connection to your host, in the server window #3, right click, then select "Add Bookmark" and give it a name. This way, next time you just have to go to "File-->Bookmarks" and won't have to enter your log in info again.
2. "Your PC" Window. Use this window to find the ProfitBombs on your computer.
Now is the hardest part. You need to use the #2 window in Leech to navigate through your PC to find the Profitbombs folder. Once you find the ProfitBombs folder, double-click it so that it looks like the #2 window below, with all the stuff inside listed.
You may have to click on the little folder shown below to move "up" your computer, as marked by the red arrow below. Think of it in the same way as the "back button" on your browser. When you've found the Profitbomb folder, window #2 should look like this:

Again, this is the hardest part. If you can't find the proftibomb folder, try doing a "find file" for it to help you find it. You will still need to get to it using LeechFTP, but "Find File" will give you some hints.
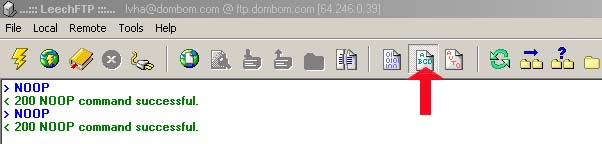
Upload in ASCII Mode: Once you have located the profitbombs, you need to make sure that you upload them in the ASCII mode using Leech. Just look at the button in the Top/Center of the Leech window with "ABCD" on it (marked by the red arrow below ) and make sure it's "clicked" (has a little square around it to make it look different). Clicking this button makes sure your pages are uploaded in ASCII.
 .
.
(Note: To upload images, you'll need to switch this button back to "Auto")
Then, if you have more than one domain (which is the whole point of NewWebHost), click on the domain of your choice, then click on the "web" directory. The "web" directory is the "root" of your website. This is where you want to put your homepage, etc. (Note: Most other hosts don't have a "web" directory. This is a feature of NewWebHost).
Once you are in the "web" directory, you should also see a folder called "cgi-bin", such as in the image below (#3):
Now:
1. Double click on the "cgi-bin" folder in window #3 to open it.
2. Click on a file in window #2 and drag it to window #3.
3. Repeat with the other folders and files.
Note: You can also click on the first directory in window #2 and then hit and hold the shift key end key on your keyboard at the same time. You should see all the files become "gray". This will select all the files in window #2. Now just drag all the files and folders at once to window #3.
Once all the files have been uploaded, window #2 and window #3 should look very similar.
Directories/Folders: Change the Permissions to 777
a. "Right click" on the "amazon_templates" folder in the window on the right. A pop up window should appear like the one below:
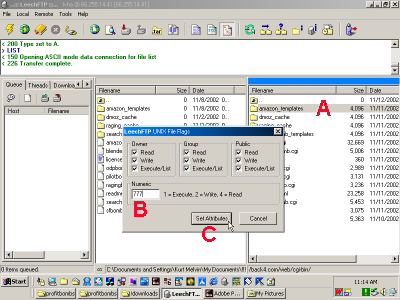
In the pop up window b change the number to "777" and c click "Set Attributes".
Repeat for the following:
a. Right click on each:
dmoz_cache searchbomb_templates
b. Choose "Set Attributes" by right clicking on each folder/directory.
c. Set each to "777" just like you did for the "amazon_templates" folder.
CGI files-Change the Permissions to 755:
Now right click on "amazon.cgi" and set the permissions (attributes) to 755, then click "OK".
a. Repeat for the following cgi files. First "right click" on:
blenderbomb.cgi pilotbomb.cgi odpbomb.cgi random.cgi pilotbomb.cgi
b. Choose "Set Attributes" by right clicking on each cgi file.
c. Set each to "755" just like you did for "amazon.cgi".
Simply put: If it's a folder, set it to 777. If is isn't a folder and ends with .cgi, set permissions to 755. Disregard anything else.
If you did everything correctly, you should be finsihed with installation. The great thing about NewWebHost is that if you set up your template folder correctly, you won't have to install Profitbombs again, it will be done for you each time you add a new domain to your NewWebhost account.
Also see:
Keyword Armory and Keyword2Link Converter
NewWebHost
$29 a month for $200 domains
and it will install
ProfitBombs each time you add a domain. All you have to do is install
ProfitBombs
once and you can have up
to 200
ProfitBomb
websites
with a single installation.